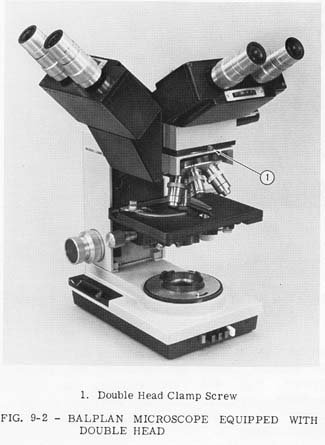
The Cat. No. 31-18-93 Double Head is available for your Balplan Microscope for the purpose of dual viewing. It is attachable to your Stand as follows:
Remove the Head that is on the Stand by
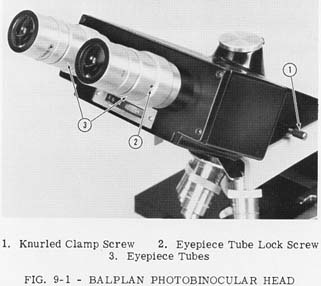
loosening the Knurled Clamp Screw, Fig. 9-1,
and lift the Head. Place the Double Head,
with the Knurled Clamp Screw screwed
out, Fig. 9-2, over the collar on the top of
the Arm. Orient the Double Head to the
desired position and tighten the Knurled
Clamp Screw.
It is recommended that one of the 30° Heads listed in Section - 3 be used at the operator's position and the 45° Head be used at the observer's position. This results in a comfortable eyepoint position for both observers.
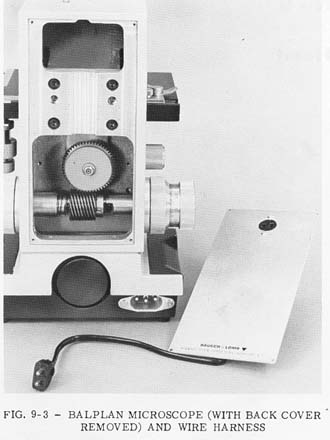
The Double Head is equipped with a
Pointer Projector which projects an illuminated
arrow into the field of view. With
the Double Head is a Wire Harness which
replaces the back cover of the Microscope,
Fig. 9-3. The Wire Harness has an
electrical outlet into which the Pointer
Projector may be connected. To install the
Wire Harness, proceed as follows:
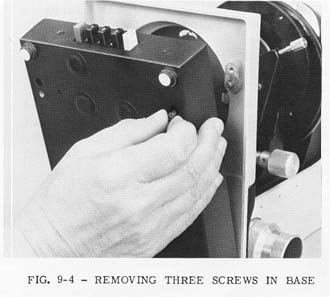
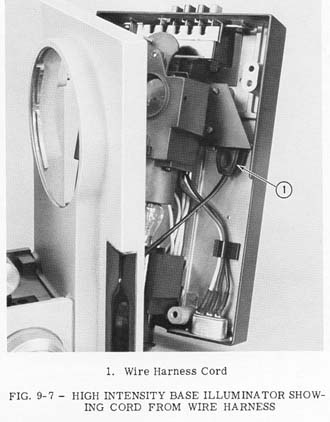
Disconnect the line cord from the power supply. Remove the Illuminator by removing the three screws, Fig. 9-4. Remove the four screws in the back cover. Replace the back cover with the Wire Harness, feeding the Cord down through the opening into the High Intensity Base Illuminator or the Profes- sional Optilume, Fig. 9-6. Connect the Wire Harness cord to the receptacle in the Base as shown in Fig. 9-7. Replace the Illuminator. If your Balplan is equipped with a Mirror for use with an external Illuminator, the cord from the Wire Harness may be con- nected to a Transformer, Cat. No. 31-35-40.
To do this, it will be necessary to remove the Bottom Cover by removing the three screws, Fig. 9-4, and running the Wire Harness Cord back through the slot in the plastic plug in the Arm. Replace the Bottom Cover.
 |
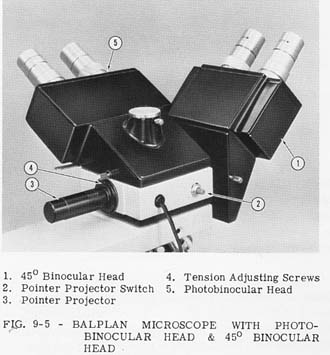 |
When the Wire Harness has been in- stalled, the cord from the Pointer Projector may be plugged into the receptacle located near the top of the Wire Harness. The Projector may be turned On or Off with the Switch shown in Fig. 9-5.
The Pointer Projector may be manipulated
such that the illuminated arrow may be
imaged at any point in the field of view. The
amount of tension on the pointer motion may
be adjusted by loosening or tightening one or
more of the three screws. Fig. 9-5.

If the image of the arrow is not in sharp focus because you are not wearing your corrective glasses, it will be necessary to make an acuity adjustment. This is accomplished by raising or lowering the Eyepieces by turning the Eyepiece Tubes, Fig. 9-1. The unknurled Eyepiece Tube is locked at the factory but may be released by loosening the set screw, Fig. 9-1. This adjustment should be made while observing the image of the arrow with first one eye and then the other. This adjustment may be necessary for both the operator and the observer.
If you have used the Photobinocular Head
with the Double Head and have made an
acuity adjustment with the unknurled Eyepiece
Tube, it will be necessary under
certain circumstances to return this tube
to its factory setting when doing Photomicrography.
If you are using the same
Eyepiece that you used when you made the
acuity adjustment and you are not wearing
your corrective glasses, then the knurled
Eyepiece Tube should not be reset. If you
are using the Viewfinder Eyepiece, Cat.
No. 42-12-02, it will be necessary to reset
the Eyepiece Tube to its original setting to
establish parfocality between the Eyepiece
focal plane and the film plane. This may be
accomplished as follows:
Place the Double Head on your Balplan Microscope and the Photobinocular Head on the Double Head. Insert the Viewfinder Eyepiece into the unknurled Eyepiece Tube and focus the Eyepiece on its reticle until the image of the reticle is sharp. Now, adjust the Eyepiece Tube up or down until the image of the arrow in the Pointer Projector is sharp.
Another way to establish parfocality follows:
Prepare your Balplan for Photomicrography using the 10X Objective. If you have the 35mm Camera or the 3-1/4 x 4-1/4 Camera, open the Camera Back and put the Viewfinder Eyepiece Adapter in the film plane. (Refer to Camera Reference Manual.) Insert the Viewfinder Eyepiece into the Adapter. Focus the Viewfinder Eyepiece on its reticle until the image of the reticle is sharp. Make sure the Camera Focusing Tube is set for the Camera you are using. Now, with the Focusing Knob of the Microscope, focus on the specimen until the image of the specimen is in sharp focus in the Viewfinder Eyepiece. Remove the Viewfinder Eyepiece and insert in the right Eyepiece Tube of the Photobinocular Head. Adjust the right Eyepiece Tube up or down until the image of the specimen is in sharp focus. This method may be used with the 4x5 Camera by focusing the specimen on the Ground Glass Focusing Screen. (Refer to Reference Manual.)
To replace the lamp in the Double Head, unscrew the end of the Pointer Projector, Fig. 9-5. Remove the lamp mount, replace the lamp and reassemble.