The following description will assist you in achieving maximum performance from your Microscope. If you have acquired more than one set of Eyepieces, select the Eyepiece which has the lowest magnification and insert it into the Eyepiece Tube. Rotate the Nosepiece until a low power Objective, preferably the 10X, is in viewing position. Place a specimen slide on the Stage, manipu- lating the specimen to the approximate center of the Stage opening. Turn on the light source.
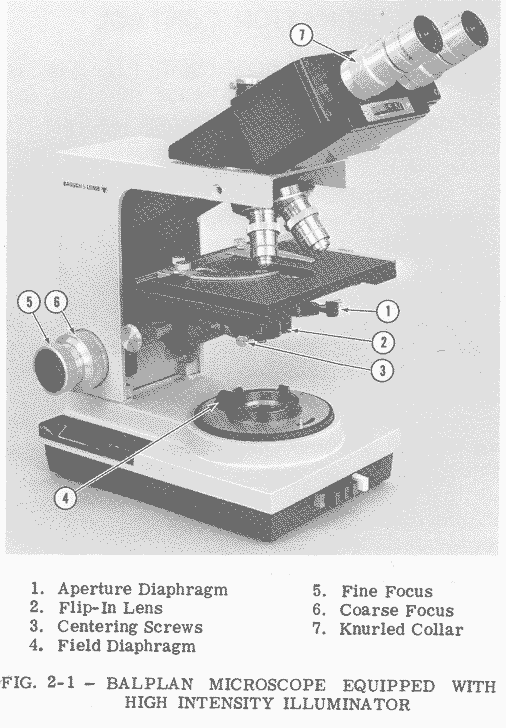
The left Eyepiece Tube is individually focusable by means of the Knurled Collar, Fig. 2-1, so that equally sharp images on both the left and right side may be attained. Focus the Microscope with the Focusing Adjustment, Fig. 2-1, until the right image appears sharp to your right eye. Then, without changing the Focus Adjustment, adjust the left Eyepiece until the image appears sharp in your left eye. The Microscope is now adjusted properly for your eyes.
Having located an area of interest on the specimen and focusing on it sharply, you may now swing a higher power Objective (on the Nosepiece) into place, since the Objectives are parfocal.
If you desire a still higher power, you may insert higher power Eyepieces.
The Microscope has a safety clutch action at the limit of the focusing motion. Should it be inadvertently focused too close so that the Objective contacts the Cover Glass, this feature will prevent serious damage to the instrument. Refer to Section - 16, Safety Clutch Adjustment, for instructions on the adjustment of this mechanism.
The High Intensity Base Illuminator has an integral Field Iris Diaphragm, Fig. 2-1. The image of this Diaphragm should be centered for optimum performance. To center the image of the Diaphragm, rotate the Nosepiece until the 1UX Objective is in viewing position, and focus on the specimen. If there is a Flip-In Lens, Cat. No. 31-55-14, mounted on the bottom of the Condenser, make sure it is removed from the optical path, Fig. 2-1. Close the Field Iris Dia- phragm to the half-open position by rotating the knurled wheel, Fig. 2-1. Vary the Condenser height until the sharpest possible image of the Field Iris Diaphragm is formed on the specimen. It will be unnecessary to vary the Condenser height for the other Objectives so long as you continue to observe specimen slides of the same thickness. Specimen slides should be no thicker than 1.25mm for optimum use of the Field Diaphragm.
Now proceed to open the Field Iris Diaphragm until the image is barely visible in the field of view. Center the image by manipulating the two knurled Centering Screws on the Substage, Fig. 2-1. The opening of the Diaphragm should be adjusted to the point where its image is just out of the field of view. For best results, the Field Iris Diaphragm should be recentered and readjusted each time a different Objec- tive is used. Under these conditions, your Microscope will be functioning in accordance with the Koehler Illumination Principles.
If your Microscope is equipped with the Professional Optilume or the Optilume, it will not have Field Illumination control.
The Aperture Iris Diaphragm, Fig. 2-1, is the principal control at your disposal for modifying the image quality of the Micro- scope. Opening and closing this Iris changes the angle of the cone of illumination entering the Objective. This modifies contrast, resolving power and depth of focus. Accordingly, it is of fundamental importance that its proper use be clearly understood.
If the Iris is closed all the way, contrast and depth of focus are generally at a maximum, but resolving power and bright- ness are at a minimum. As the Iris is opened, contrast and depth of focus decrease but resolving power and brightness increase. Since clarity of seeing is dependent on all of these factors, it is apparent that one should set the aperture Iris for the best compromise possible.
The Iris should not be used to control brightness. Other means, such as voltage control or filters, should be used instead. Using the Iris to control brightness will impair its effectiveness in controlling con- trast, resolving power and depth of focus since the aperture selected for desired brightness may not be the setting necessary to optimize the other factors.
The Aperture Diaphragm should not be opened wider than is sufficient to fill the objective with light (tested by looking at the back lens of the Objective after removing the Eyepiece), and generally it is advisable to start with only about two-thirds of the back lens of the Objective filled with light. From this starting point, open and close the Diaphragm until the best compromise is obtained between resolution and contrast.
In the examination of most microscopic preparations, the problem is to differentiate low contrast structure, which is difficult to see because its color or opacity differs so little from its surroundings, rather than to observe detail at the limit of resolution of the Objective. The skillful use of the Aper- ture Diaphragm will be extremely helpful in examining such specimens by bringing out the optimum definition in the image. Often different Diaphragm settings are re- quired for different types of detail within the same preparation. Experience and study are required to learn the most effective use of the Diaphragm.
It has often been stated that little is gained in using an Oil Immersion Objective unless the Condenser is oil immersed. This is not so. Experience has shown that the most satisfactory image is the result of a com- promise between resolution and contrast, and that this is obtained when the Objective is used at about 2/3 of its maximum aperture. This condition is almost automatically esta- blished when an Oil Immersion Objective is used with a dry Condenser. It is therefore common practice to use Oil Immersion Objectives without immersing the condenser. The Objective, of course, must always be immersed.
It is true, however, that the Objective will be unable to deliver its maximum resolving power unless its back aperture is filled with light, and this condition cannot be satisfied for an Oil Immersion Objective unless the Condenser is also oil-contacted to the slide. To accomplish this, lower the Condenser slightly, place a drop of oil on the top lens of the Condenser, place the slide on the Stage and then bring up the Condenser with the Focusing Adjustment until contact of oil and slide is established. The Illuminator adjustments described earlier should now be repeated.
The Cover Glass, which is normally placed over the specimen, might appear to be a rather insignificant item and little consideration given to it in the preparation of the specimen slide. This, however, is far from true, as the Cover Glass becomes an integral part of the optical system, especially when dealing with high power dry Objectives. All Bausch & Lomb Balplan Microscope Objectives have been designed to be used with 0.18mm thick, plane-parallel Cover Glass having a refractive index of ND 1.522.
Variations of only a very few hundredths of a millimeter in thickness from the nominal 0.18mm are sufficient to cause a marked deterioration of image contrast when using the 40X, 0.65NA Objectives or higher power. The change in aberration correction (spheri- cal aberration, primarily) with respect to Cover Glass thickness increases exponen- tially with numerical aperture for dry Objectives. Low power Objectives having N.A.'s of 0.25 or less are much less sensi- tive to Cover Glass thickness. Oil Immersion Objectives are also insensitive because the oil and glass are almost homogeneous in refractive index. However, Oil Immersion Objectives have a very short working distance (distance from front of the Objec- tives to the specimens) and with too thick a Cover Glass, it will be impossible to focus on the specimen.
Cover Glasses are available from any laboratory supply house and are usually sold according to thickness. The usual commercial classifications are Nos. 1, 1-1/2, 2, and 3, the thickness range of each group being:
Cover Glasses No. 1, 1-1/2, and 2 are the ones used most commonly.
No. 1 Cover Glasses, because of their thickness, are preferable for use with Oil Immersion Objectives, but No. 1-1/2 Cover Glasses may also be used with these Objectives.
The No. 2 Cover Glass is a general purpose glass used for examining specimens under low power dry Objectives, the thicker slips in this group being used for the lower powered Objectives.