
This Microscope has been packed to ensure that it reaches you in the best possible condition. Notice that a translucent plastic dust cover for the Microscope has been packed with the Microscope.
When you have read this section and have finished assembling the instrument, carefully check all packaging material for any small items that may have been over-looked before discarding the cartons.
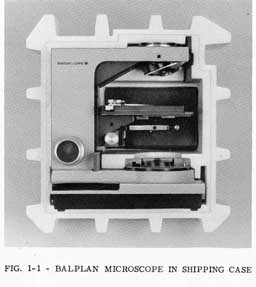
Remove the Microscope Stand from its packaging. The Stand is shipped with the Nosepiece, Stage, Illuminator, and Lower Base or Cover in place, Fig. 1-1.
If the Microscope is equipped with either a High Intensity Base Illuminator, Cat. No. 31-32-14, Frontispiece, or a Professional Optilume, Cat. No. 31-32-13, Fig. 1-2, the Lower Base on the Microscope contains a built-in transformer and controls. The Power Cord is a three-wire cord and should be connected to the back of the Illuminator and to a grounded 120V A.C. outlet.
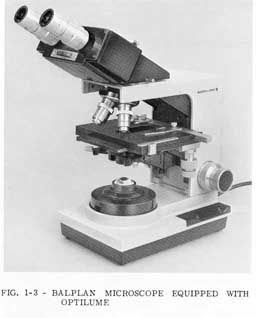
If the Microscope is equipped with an Optilume, Cat. No. 31-32-12, Fig. 1-3, it will have been factory installed and needs only to be plugged into a grounded 120V A.C. outlet.
If the Microscope is equipped with a Mirror, Cat. No. 31-50-66 or 31-50-67, Fig. 1-4, it will be found in an accessory carton. It can be snapped into the Upper Base after aligning the clips on the Mirror base with the slots in the Upper Base.
A Hexagonal Wrench for adjusting the Stage and Substage stops and for removing the Nosepiece, if necessary, is included. It is sealed in an envelope which is packed in the accessory carton.

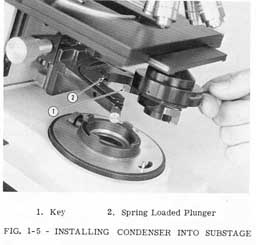
The Condenser ordered with the Microscope is in an accessory carton. To install the Condenser, first, rack the Substage down. It may be necessary to loosen the Substage Bottom stop, using the Hexagonal Wrench provided, to allow the Substage to be racked down. The Condenser can now be snapped in place by pushing the Key on the Condenser into the spring-loaded plunger in the Substage, Fig. 1-5.
The Head is packaged in an accessory carton. Loosen the knurled screw on the Head and place the Head over the collar on the top of the Arm. Orient the Head to the desired position and secure by tightening the knurled screw, Fig. 1-4.
The Eyepieces and Objectives are in an accessory carton. Insert the Eyepieces into the Head. One of the apertures in the Nosepiece is identified by a green mark. Screw the 10X Objective into this aperture. It is suggested that the Objectives be mounted on the Nosepiece in the order of ascending power with a clockwise rotation of the Nosepiece, Fig. 1-4.
Your Microscope is now ready to operate.