The primary rule to follow with respect to proper care of the Microscope is to keep it as free from dust and dirt as is possible. Dusty lenses will result in foggy images. A fingerprint or a smear, on the other hand, will degrade the image badly, giving a milky, washed-out appearance. When not in use, cover the Microscope with the plastic cover which is supplied with it.
The experienced microscopist keeps the optics of his Microscope clean and free from fingerprints and dust.
Every installation should be provided with a camel's hair brush, syringe, and. a well washed piece of linen. On account of its fine texture, a piece of linen that has been washed several times is the most desirable cleaning material. No dust should be permitted to settle 'upon the lenses, nor should fingers come into contact with any of the surfaces.
The Objectives and Eyepieces may be removed from the Microscope for cleaning, but they should never be disassembled, since it is almost impossible to re-establish their precision factory alignment.
To remove dust, try to blow if off with a syringe, or dust it off with a camel's hair brush. Avoid hard wiping, as dust is often hard and abrasive. To remove fingerprints, wipe lightly with a clean soft cloth or absorbent cotton, lightly moistened with soap and water, alcohol, or as a last resort, Xylol. A small amount of absorbent cotton wound on the end of a tapered stick makes a handy cleaning tool for recessed optical surfaces. Avoid excessive use of solvents as this may cause run-ins in cemented optics, or the flowing solvent may pick up grease from the mounts, making cleaning a tedious job.
Clean immersion Objectives immediately after use by removing the fluid with lens paper or clean soft cloth.
Quality Lens Paper is available from most Scientific Supply Houses or from Bausch & Lomb as Cat. No. 31-50-60 and 31-50-62.
Should the exterior surfaces of the Micro- scope become dirty, it may be cleaned with a soft cloth moistened in Chlorothene. Avoid the use of excessive solvent which might run into bearings and dilute their lubricant.
Lubrication of the Microscope is rarely required, due to the use of ball-bearings and nylon bushings in all critical friction points. The Coarse and Fine Adjustment mechanism uses self-lubricated ball- bearings for both thrust and slide bearings.
The Glide Stages depend for their action on a controlled drag in the greased bearing surfaces. This grease layer should be replaced if the Stage motion becomes too stiff. The recommended grease is available in a 1-oz. jar from Bausch & Lomb. Specify Cat. No. 31-50-04.
Remove any immersion oil which may adhere to any part of the Stand with a cloth moistened with Chlorothene and wipe dry with a soft lintless cloth or chamois.
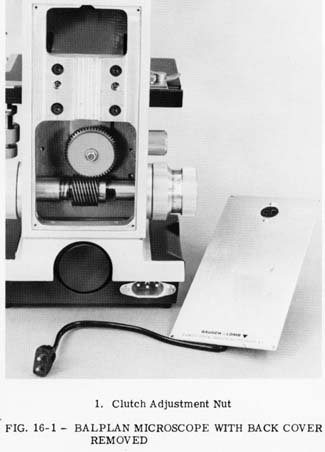
The focusing motion safety clutch is set at the factory to provide an optimum balance of forces which will prevent the Stage from slipping downward under normal usage. An adjustment of this clutch setting is available if it is desirable to place a heavy object on the stage. The clutch adjustment nut is accessible by removing the cover in the back of the Arm, Fig. 16-1. Using a 5/16" socket nut driver, available at most hardware and radio supply houses, the adjustment nut can be engaged. A clockwise turn will tighten the clutch; counterclockwise rotation will loosen it. Always remember that too loose an adjustment will permit the Stage to drop out of focus upon the slightest shock or additional weight (possibly even of its own weight); too tight an adjustment will cause damage to specimen slides and Objectives if the Stage should inadvertently be focused too high.