Various means have been developed for accomplishing Dark Field Illumination. The device used generally consists of a special Condenser for the Substage of the Microscope replacing the Condenser employed for Bright Field Illumination. It is usually used in conjunction with a conventional Microscope Illuminator and provides a hollow, annular cone of light. The apex of the cone is formed at the object plane.
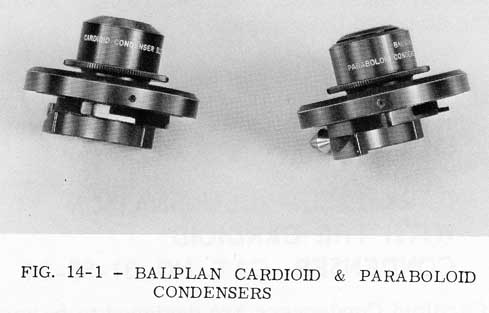
In the Balplan Microscope, Dark Field Illumination is achieved with the Paraboloid Condenser, Cat. No. 31-55-33, or the Cardioid Condenser, Cat. No. 31-55-34, Fig.14-1.
Successful Dark Field Illumination requires a light source of high intensity. Sky light and the light provided by frosted lamps of the common variety are inadequate. The Balplan High Intensity Base Illuminator provides ample illumination for dark field use with either the Paraboloid or Cardioid Condenser and has the advantage of being a built-in aligned unit.
Paraboloid Condensers are primarily designed to be used with a medium to high power Objective.
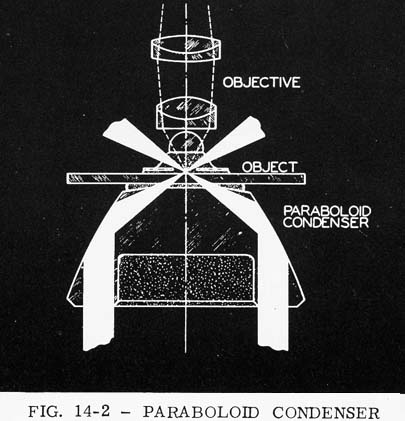
The principle of the Paraboloid Condenser
is illustrated in Fig. 14-2. Parallel
light passes around the opaque central stop,
is reflected at the parabolic surface, and
exits through the upper piano surface into
the object slide. For optimum results
(achieving maximum contrast between object
detail and background) the object plane must
coincide with the point of focus of the
Paraboloid Condenser. Light passes through
this point under angles equal to numerical
aperture limits of 1.20 to 1.37. Since the
N.A. limits are greater than 1.00, it is
always necessary to maintain oil contact
between the Condenser and object slide.
Furthermore, to realize the dark field
image, it becomes necessary to use an
Objective with an N.A. of less than 1.24.
 This necessitates the 100X 1.25 N.A.
Objective be used with a Funnel Stop. A
Funnel Stop is a fixed Diaphragm designed
to reduce the N.A. of an Objective. A special
wrench is supplied with the Funnel Stop
to aid in its installation. The two prongs of
the wrench fit the slots in the Diaphragm
at the top (Nosepiece end) of the Objective.
Unscrew the Diaphragm from the Objective,
turning the wrench counterclockwise as for
a normal screw thread. Replace the Dia-
phragm with the Funnel Stop, using the
wrench to tighten it into place. When
returning to bright field use of the Objective,
remove the Funnel Stop and replace it with
the standard Diaphragm.
This necessitates the 100X 1.25 N.A.
Objective be used with a Funnel Stop. A
Funnel Stop is a fixed Diaphragm designed
to reduce the N.A. of an Objective. A special
wrench is supplied with the Funnel Stop
to aid in its installation. The two prongs of
the wrench fit the slots in the Diaphragm
at the top (Nosepiece end) of the Objective.
Unscrew the Diaphragm from the Objective,
turning the wrench counterclockwise as for
a normal screw thread. Replace the Dia-
phragm with the Funnel Stop, using the
wrench to tighten it into place. When
returning to bright field use of the Objective,
remove the Funnel Stop and replace it with
the standard Diaphragm.
A word of caution - the top lens is somewhat exposed when the Diaphragms are removed. Care should be exercised to avoid touching this surface.

Cardioid Condensers are designed to be used primarily with a high power Objective. The principle of the Cardioid Condenser is illustrated in Fig. 14-3. It is a reflecting form of Condenser, free from both chromatic and spherical aberrations. By virtue of the curved reflecting surfaces, the rays of parallel light entering around the central stop are formed into a hollow cone and brought to a mathematically correct focus.
Light passes through the point of focus of the Cardioid Condenser under angles equal to numerical aperture limits of 1.20 to 1.39.
As with the Paraboloid Condenser, in order to achieve a dark field image, an Objective with an N.A. of less than 1.20 must be used. Oil contact between Cardiod Condenser and the object slide is also required.
To mount the Paraboloid or Cardioid Condenser to the Substage, rack the Sub- stage down. The Condenser will snap in place by pushing the Key on the Condenser into the spring-loaded plunger in the back of the Substage.
The Bodies of these Condensers are threaded and are provided with a lock ring, so that its height in the Substage may be adjusted and the Condenser locked in place. If the Substage Stop was previously set for Bright Field Illumination, rack the Substage up to its highest position and adjust the Condenser vertically by screwing the threaded portion up or down until the top of the Condenser is just below the top of the Microscope Stage. Then, lock it in place by means of the lock ring. This will allow you to interchange Bright Field and Dark Field Condensers without adjustment of the Sub- stage stops.
Two Substage Centering Screws are
supplied with the Dark Field Condensers,
Fig. 14-4. If your Substage is not already
equipped with Centering Screws, Cat. No.
313214-198, the Set Screws, Fig. 14-4,
should be replaced with the Centering Screws
supplied with the Condenser. Use the
Hexagonal Wrench supplied to remove the
Set Screws.

By means of the two Centering Screws, adjust the Condenser until its top is centered in the Stage opening. Select a specimen slide no thicker than 1.35mm. Make sure that the slide is clean. Mount the material to be examined on it and cover it with a #1-1/2 Cover Glass. Place a generous drop of oil on the Condenser and lower it slightly below the surface of the Microscope Stage by racking the Substage down. Place the slide on the Stage and rack the Condenser up until oil contact with the slide is made. Use a 10X Objective and focus on the specimen. Focus the Condenser up and down by means of the Substage Rack and Pinion until the smallest spot of light is seen in the field. If your Illuminator has an Iris Diaphragm, open the Diaphragm completely. Make final centering adjustments of the Condenser by means of the Centering Screws, Fig. 14-4.
Having completed the above adjustments, all that remains in order to proceed with dark field observations is to substitute the desired high power Objective for the 10X Objective used for centering purposes.
Slides for use with the Dark Field Con- densers must be no thicker than 1.35mm.Thinner slides are more desirable since some focal adjustment of the Condenser is permitted. Slides thinner than 1.0mm may, however, cause trouble through difficulty in maintaining adequate oil contact between the Condenser and the slide. Specimen slides vary in thickness in any one box. One should select slides by actually measuring them with a micrometer caliper. The cover glass should also be carefully measured if it is intended to use a "high dry" Objective. The cover glass for such an Objective should be selected for 0.18 + 0.05mm thick- ness. The cover glass thickness is of less importance when an oil immersion Objective is employed. However, the maximum thick- ness that can be readily accommodated with an oil immersion Objective is about 0.2mm.
Slides and cover glasses must be scrupulously clean and free from pits, scratches and similar defects. It is best to measure and select a number of slides and cover glasses at one time and reserve them for dark field work. Slides of optical quality fused quartz, ground and polished to the desired thickness, are available and are recommended for use. This is particularly important for ultramicroscopy with the Cardioid Condenser.
CAUTION: Do not put a thick or highly concentrated suspension on the slide. Be sure not to have too much solid material in the preparation. Best dark field results will be obtained from mounts which appear void to the unaided eye.
Place a drop of the solution to be examined on the slide, cover with a cover glass and blot off any excess liquid with absorbent cotton, filter or blotting paper.
The best results are obtained when using a Paraboloid or Cardioid Condenser if theN.A. of the Objective is not more than 1.0. The Balplan 10X, 0.25 N.A.; 20X, 0.50 N.A.; and 40X, 0.65 N.A. Objectives are suitable. If higher magnification is required, the Balplan 100X, 1.25 N.A. Objective should be employed, along with its appropriate Funnel Stop, Cat. No. 31-51-71.
Be sure the Objective does not have old immersion oil on the tip. Clean it carefully, Place a drop of oil on the cover slip, taking care to prevent the formation of bubbles. Cargille's Immersion Oil is recommended, It can be readily wiped off an Objective or slide with lens tissue and a very little solvent such as toluol or xylene. It is better than cedarwood oil in this respect and is, in addition, non-drying, non-fluorescing, colorless and has the proper refractive index for glass.
Raise the Stage until the oil drop contacts the tip of the Objective. Look into the Eyepiece(s) and carefully focus the Microscope using the fine adjustment until the specimen preparation is seen clearly.
If brilliantly-illuminated circles are observed, the cause may be air bubbles in the preparation, in the oil below the slide, or in the oil above the slide. When focusing any instrument used with immersion oil, always turn the Fine Adjusting Knob slowly to avoid drawing bubbles into the oil.
After use, wipe the oil off the Condenser and Objective with cotton or lens tissue.
Back - Section 13