Unstained colorless transparent microscope specimens frequently lack contrast when viewed under standard bright field illumination. Previously, time-consuming preparation methods were necessary which resulted in harmful physical or chemical changes that would destroy structural detail in the specimen.
Phase Contrast Microscopy overcomes this difficulty and permits the examination of living material without resorting to staining. This method can also be used with fixed and dry specimens including microtome sections. Even the selective differentiation of structure in fixed specimens is possible without staining, if mounting media of the correct index are used.
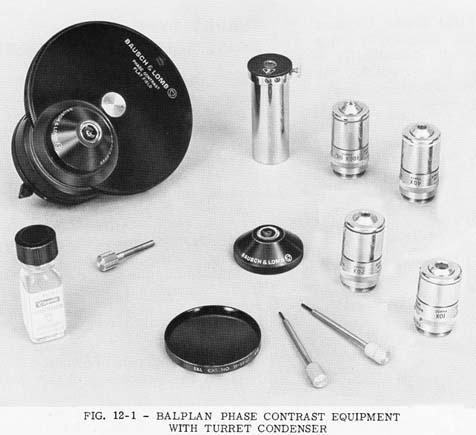
Bausch & Lomb Phase Contrast accessory equipment is available in two types as follows:
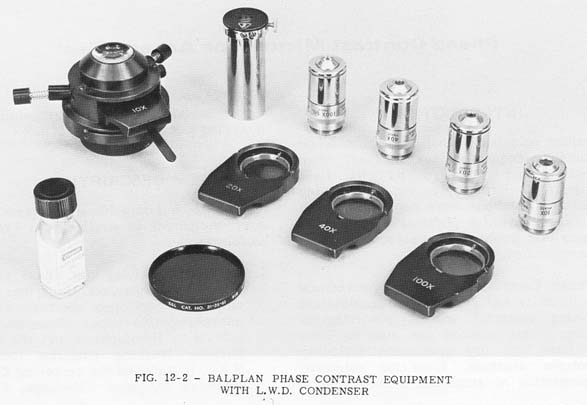
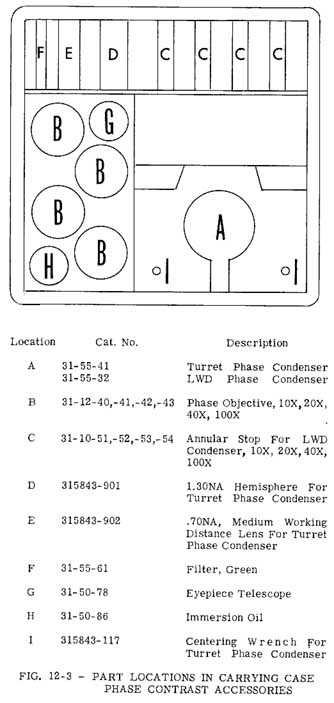
The Objectives are supplied in clear plastic screw-top containers for protection, and the entire Phase Contrast Accessory Kit is packed in a black leatherette-lined case with all parts fully assembled and ready for attachment to the Microscope Stand. The case is of the same design for both Kits. A diagram of the interior of the case with part locations labeled for each of the possible Kit combinations described above is given in Fig. 12-3.
To install the Turret-Type Phase Contrast Condenser on the Substage:
The standard lens may be used with specimen slides up to 1.3mm thick. The Medium Working Distance Lens has aworking distance of 3.7mm in air (5.6mm in glass) and is ideally suited for blood cell counting chamber work.

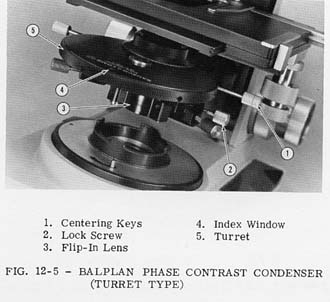
The Microscope is set up for Phase Contrast operation by removing the regular Objectives from the Nosepiece and replacing them with the Flat Field Phase Contrast Objectives. Make sure that the Iris Diaphragm on the Phase Turret Condenser is completely open. Rotate the Turret, Fig. 12-5, until the figure "0" appears in the index window. Focus on a stained specimen. If it becomes necessary to reduce the intensity of the illumination for better observation, do so by inserting a neutral density filter in the Illuminator. The green filter may also be used if desired. If the Microscope is equipped with the High Intensity Base Illuminator, the Field Diaphragm should be centered as described in Section - 2, under Field Illumination Control. Now rotate the Turret until the number corresponding to the Objective in use appears in the index window. Do not use the Iris Diaphragm to control the illumination level after the proper Condenser Annular Diaphragm has been selected and adjusted for use.
If the Microscope is equipped with a Bertrand Lens Attachment, Cat. No. 31-57-85, move the Bertrand Lens into viewing position. Focus on Annular Diaphragm, using Bertrand Lens Focusing Knob. In the absence of a Bertrand Lens, replace the Microscope Eyepiece with the Auxiliary Eyepiece Telescope. Focus on the grey ring pattern appearing in the field of view. This is done by loosening the clamp screw on the Eyepiece Telescope, adjusting the Eyepiece Tube of the Telescope and then tightening the clamp screw. Make sure that the Telescope is resting with its positioning ring firmly against the Microscope Eyepiece shoulder. The brightly illuminated image of the Condenser Annular Diaphragm and the retardation annulus in the Objective will appear in the field of view of the Eyepiece Telescope. The bright image must now be adjusted so that it lies completely within the grey ring. This is done by means of two centering screws located within the Turret Assembly.
Insert the two Centering Keys into the
two rearmost holes on the knurled ring of
the Turret, Fig. 12-5, and turn the Keys
alternately while observing the movement
of the bright ring until it is concentric with
and completely covered by the grey ring.
Fig. 12-6 shows the overlapping annular patterns when they are in the typical "non- centered" positions. Remove Centering Keys before attempting to rotate Turret.
The retardation annulus is intentionally made slightly broader than the image of the Annular Diaphragm to ensure that the latter is completely covered, which prevents leakage of light around the retardation annulus. Any such light leakage would reduce the degree of contrast attainable.
The centering procedure should be necessary only once for each Objective, when the equipment is first installed. When done properly, Objectives and Annular Diaphragms may be interchanged at leisure, without need of repeating this centering procedure each time.
If necessary, raise or lower the Condenser slightly in order to perfect the registration of the two annular patterns.
With the 100X F.F. Phase Contrast Objective, there are two positions of the Substage Condenser, separated by approximately 2mm, in which the Annular Diaphragm appears to be focused on the retardation annulus. However, only in the upper position can the bright Annular Diaphragm be centered to the dark retardation annulus.
To make examinations under ordinary bright field conditions, rotate the Turret until the figure "0" appears at its index window. This permits the use of the Condenser at full aperture. Aperture illumination is then controlled by the use of the Condenser Iris Diaphragm. The 31-55-14 Flip-In Lens, used with Turret Condenser, will allow a 4X Objective to be used.
The Long Working Distance Condenser has an unusually long working distance (from 8 to 10mm in air) which makes possible the use of Phase Contrast Microscopy in such special laboratory applications as cell growth and tissue culture chambers.
To install the Long Working Distance Condenser:
Remove the regular Objectives from the Nosepiece and replace them with the Flat Field Phase Contrast Objectives. Focus on a stained specimen. If it is necessary to reduce the intensity of illumination, insert a neutral density or green filter in the Illuminator.
Insert the annular stop corresponding to the Objective in use into the slot in the LWD Condenser, making sure that it clicks into position. Open the Substage Iris Diaphragm all the way. Focus the Condenser such as to image the Field Diaphragm (if the Illuminator is so equipped) on the specimen.
Use the same procedure for centering the Annular Diaphragm as was described previously using the Turret-type Condenser. Use the Centering Keys, Fig. 12-2, to adjust the two centering screws until the bright ring lies completely within the grey ring, Fig. 12-6. This procedure will be necessary for each of the four annular stops when used with their corresponding Objectives. Centering should be necessary only once for each stop and corresponding Objective, when the equipment is first installed.
The LWD Condenser will fill the field of the 4X Achromat Objective if it is desired to do low power Bright Field Microscopy.
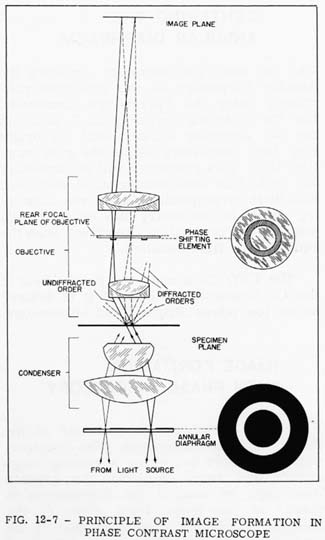
Fig. 12-7 illustrates the principle of the Phase Contrast Microscope. (The Eyepiece, which primarily serves as a viewing magnifier, has been omitted.) An Annular Diaphragm to control the illumination is placed in the lower focal plane of the Substage Condenser, and is imaged by the Condenser and Objective at the rear focal plane (exit pupil) of the Objective. An annular phase altering pattern ("retardation annulus") is placed in this plane. As shown by the solid lines, light from the controlling Annular Diaphragm which is undeviated by the object structure and enters the Objective will pass through this annular phase altering region and will effectively acquire an advance in phase of one-quarter of a wavelength of green light over that part of the light diffracted by the object structure (shown by broken lines), gathered by the Objective, and passing through that region not covered by the phase altering pattern. The final image will be formed through the resulting interference effects between the two portions of light. Alterations in phase relations in the illuminating rays, introduced by elements of the specimen material which otherwise would be invisible, are translated into brightness differences by the action of the retardation annulus. The resulting Phase Contrast image reveals structural details under enhanced contrast.
In general,the only requirement for adequate illumination with the Phase accessories is that the Annular Diaphragm of the Condenser be fully and evenly illuminated when the Condenser itself is properly adjusted with respect to the specimen plane and the Objective.
In the Koehler method of illumination the lenses of the Illuminator (or the position of the lamp) are adjusted such that an image of the light source is focused on the Annular Diaphragm of the Phase Condenser. The Condenser, in turn, is adjusted to focus an image of the Illuminator Iris Diaphragm such that it is seen in focus simultaneously with the specimen under observation. The opening of the Diaphragm should be adjusted until its image is just slightly larger than the area being studied.
For a given combination of Objective and Eyepiece, the area of the illuminated field will further depend upon the focal length of the Microscope Substage Condenser, the opening of the Illuminator Diaphragm (or the diameter of the Collector lens or Illuminator Window, where no Diaphragm is involved), and on the distance between the Illuminator and the Substage Condenser of the Microscope.
A Flip-In Lens Attachment, Cat. No. 31-55-14, is available for use with the Turret-type Phase Condenser which makes it possible to illuminate the field of view of the 4X Achromat for Bright Field Microscopy.
The illumination at the Diaphragm plane of the Substage Condenser Unit must be adequate to fill the Annular Diaphragm fully and evenly. Where the light source itself is imaged on the Annular Diaphragm, the image must be large enough in its smallest dimension to cover the annulus completely. Fulfilling this condition ensures coverage of the Objective aperture with even illumination over the entire region of the retardation annulus.
The full aperture of the Phase Objective contributes to the formation of the final image, since the diffracted rays of light gathered by the Objective pass through on either side of the retardation annulus.
These Objectives are specifically intended for use in the method of Phase Microscopy, and, because they are fitted with a special -annular phase altering pattern, they are not ideally suited for use apart from this system. Although they can be used for routine examinations in ordinary Bright Field Microscopy without serious risk, it is of considerable advantage to use the standard Objectives designed to yield optimum performance in demanding situations.
Other restrictions which apply to the conventional Microscope Objectives, such as correct tube length, cover glass thickness and refractive index of immersion oil, must similarly be met for the Phase Contrast System. Specimen slides must be of a thickness compatible with the working distance of the Substage Condenser.
The Bausch & Lomb Phase Contrast Objectives are designed to give positive, or dark, contrast. In the resulting phase image, regions of greater optical path in the object will appear darker than those of less optical path. Since optical path for light passing through a medium of refractive index n, and a thickness t, is given by nt, regions of equal thickness having a higher refractive index will appear darker than equally thick regions of lower refractive index. Regions of equal refractive index, but having greater thicknesses, will likewise be darker than those having equal refractive index, but of less thickness.
The Phase Contrast Objectives introduce one-quarter wavelength, of light phase shift when using green light. The use of other colored filters, although not restricted, will normally result in a departure from this amount of shift. In a few cases, where the object has undergone light selective staining, for example, the use of proper color filters may prove of some advantage in enhancing contrast.
Use of white light is also permissible. When using white light one can expect some loss of image crispness and slight coloration effects which are characteristic of the objectives, light source, specimen structure. and mounting.
The Condenser can be used "dry" for all phase observations. Since the requirements on the numerical aperture to be filled for any of the Phase Contrast Objectives never exceed 1.00 N.A., including the Oil Immersion Objective, there is no advantage to be gained through the use of oil with the Condenser.